
How To Lock In With Drums On Bass
How to Lock In With Drums on Bass (A Step-by-Step Method)
The most important role of the bass is its role within the rhythm section. Learning how to lock in with drums on bass is a skill every bassist needs to develop, but what does "locking in" actually mean? Locking in with drums means your bass rhythm has a clear, consistent relationship to the kick and snare. It’s not necessarily copying them, but responding to them predictably enough that the two instruments feel like one rhythmic unit. It's not a feeling you chase; it's a relationship you can identify and build on purpose.
Bassists are often told to "listen to the drummer" or "feel the pocket." That advice isn't wrong, but it doesn't give you a method for actually developing the skill.
Successful growth starts with understanding, never guessing, what the drums are doing.
In this lesson, you'll learn a system for mapping the kick and snare pattern of a song on a visual rhythmic grid. By making the underlying drum pattern visible, you can identify where the bass and drums align, where they diverge, and how those relationships shape the groove.
Instead of simply trying to "feel" the pocket, you'll learn to see the rhythmic structure you're playing against and make informed decisions about your own bass line.
Locking in with drums on bass means your bass rhythm has a clear, deliberate relationship to the kick and snare. Each note responds consistently, without copying the drums, so the rhythm section is heard and felt as one unit. To build that relationship, start by mapping the kick/snare pattern visually, then choose the bass rhythm that supports it.
The Groove Lab Rhythm Map
The Groove Lab Rhythm Map is a simple system for writing down what the kick and snare are playing, so you can see the pattern instead of just trying to feel it.
Step 1: Build Your Rhythmic Grid
Choose a mapping system, either the Rhythm Yard Stick, or the 1e+a grid.
Use whatever is easiest to read and use, just as long as the 16th note subdivisions are represented.
To better understand the drums, we need to map or write down, in an easy-to-read and consistent way, what they are playing. There are multiple techniques you can use to visualize this “map” of the drum pattern. One is the Rhythm Yard Stick, created by Victor Wooten and Anthony Wellington, this is where I first learned the idea of mapping subdivisions this way. The idea is you write down every 16th-note subdivision of a measure of music on a line, similar to a ruler.
Another method is using a 1e+a 2e+a 3e+a 4e+a rhythmic grid, again written down on either paper or a whiteboard. There are multiple ways to represent the 16th-note subdivisions of a measure that don’t require staff notation. Which you use is up to personal preference. The goal is to have an easy-to-read and write system for identifying the kick and snare hits in a drum pattern.
Step 2: Listen For The Pulse
Play the song listening for the pulse, be sure to count and connect your body, while tuning out the other instruments.
Rewind and listen as many times as necessary, the results improve with time and repetition.
Once you have a rhythmic grid outlined, next you need to listen to the music, but keep your focus on the overall pulse while counting and moving your body with the music. This sounds easy, but beginners often notice they are distracted by the other instruments as they listen. If this happens to you, don’t panic. You can rewind and listen as many times as needed.
Step 3: Map The Kicks & Snares
Mark “K” for kicks, and “S” for snares onto the grid as you identify them.
Perfection isn’t necessary, an approximate map that is easy to see and read is better than one you are still trying to hear.
As you become comfortable focusing your listening on the rhythm and drums of a song, you can proceed to the next concept. You may have already noticed where certain kick and snare hits land if the pattern is simple, or you are already familiar with the song. If that’s the case, start filling in your map with “K’s” for kicks and “S’s” for snares. If you are struggling, don’t feel like you need to get it all right or even finish it on the first attempt or even day of practicing this. The idea is to treat it as a practice; the more often you do this, the easier it becomes.
Step 4: Analyze The Pattern
Once You’ve map is filled in, identify any noticeable patterns in the drum parts.
After several listens, or if you’re confident it’s finished and accurate, take a look at the drum pattern visually and ask yourself the following questions.
“Are there any patterns or motifs used?”
“Where does the kick always/never land?”
“Where does the snare always/never land?”
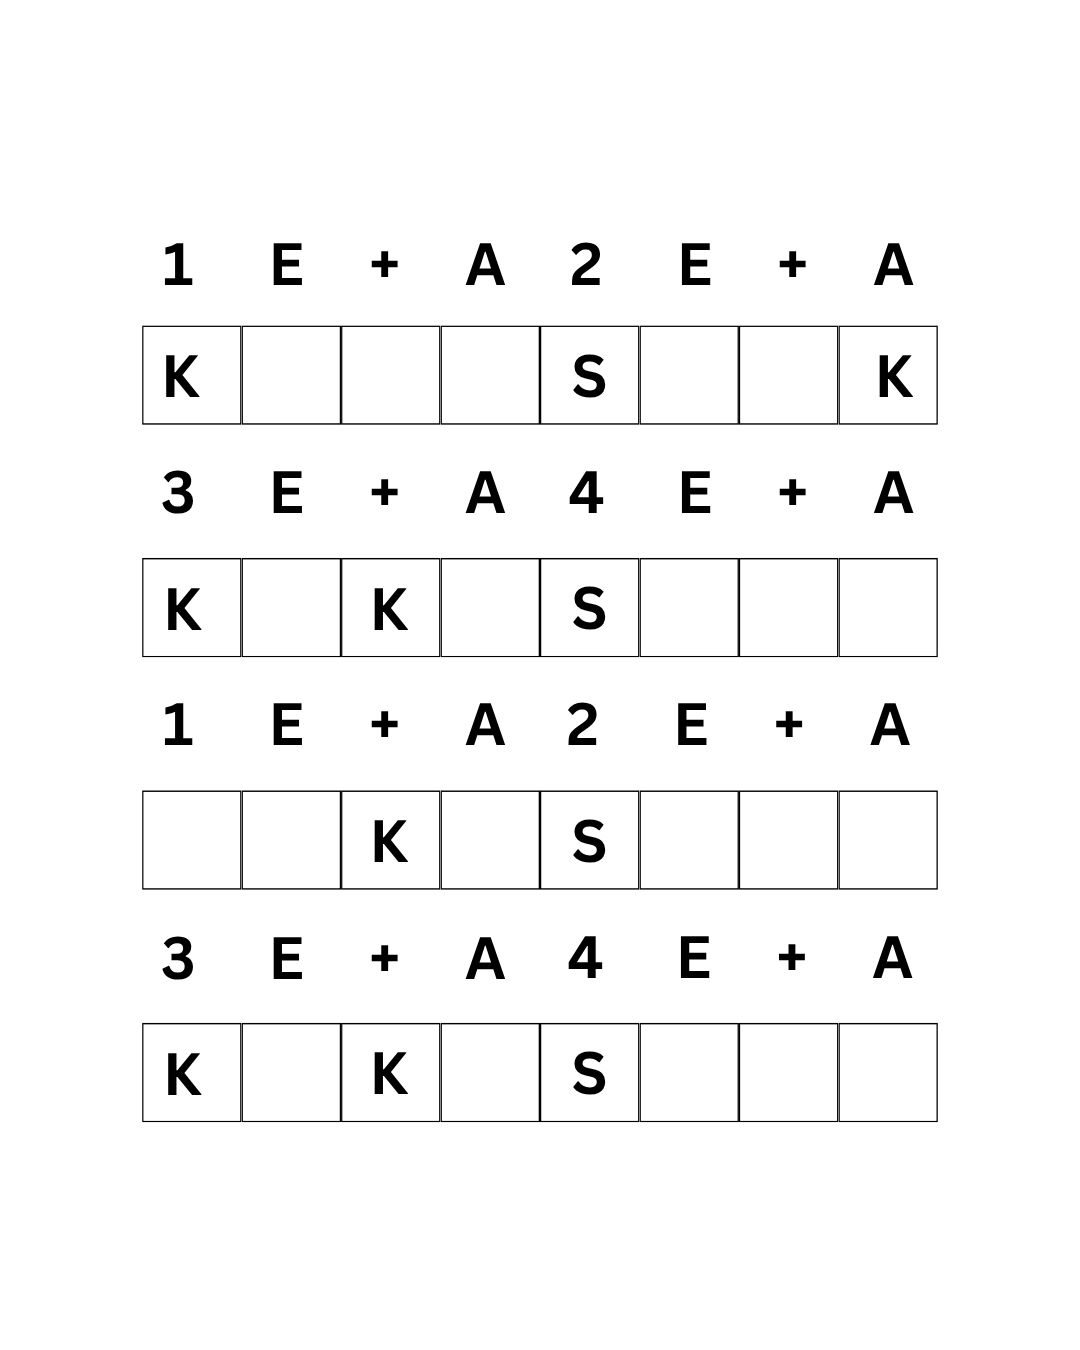
Example From Groove Lab Study 1
Below is an example of what a filled out Rhythm Map looks like, the example maps the drum pattern from Groove Lab Study 1.
Step 5: Add Your Bass Rhythm
Support the kick’s on strong beats with staccato notes.
Play around, not on top of, the snare hits.
Experiment then evaluate, what relationships do the bass and drum rhythms have.
Now that you have a map of the drum’s rhythm, and you’ve started to analyze it, you’re ready to think about how to add a bass line that locks in with the drums. The goal should be to complement the drum pattern without simply copying it, but instead think about the spaces left and how to fill them.
Often, drum grooves fall into patterns. This is necessary to hold the song together. But too little variety is likely to lose energy over time. By filling in empty spaces, the bass can create interest and excitement without diluting the impact of the other instruments.
One example of this is, if the snare hits in the same place each measure, think about playing around those beats either before, after, or both to create contrast and motion.
At the same time, the goal isn’t to avoid playing at the same time as the drums entirely. There are so-called “strong” or emphasized beats that the bass often should support with the kick drum. In those cases, using short duration, or staccato phrasing, allows the bass to add pitch to the beat of the kick drum.
A natural starting place is to copy the kick drum’s strong beats with short notes, while playing around the snare hits with more legato phrasing. Experimentation is encouraged, and when you find something pleasing, ask: What relationship does my bass rhythm have with the drums?
This approach yields more consistent results than trying to follow any pre-set pattern.
Translating Ideas Into Grooves
The Rhythm Map method assumes some foundational skills and vocabulary, use the following resources to review or fill in any gaps.
Groove Vocabulary, or the language bassists use to define and describe pocket and groove.
Groove Theory, the concepts used in every bass line that include space, repetition, and note duration.
Time and Internal Pulse, the defining ideas and supporting drills that train the basics of rhythmic literacy and execution.
Groove Lab As A System
Those principles and skills are at the center of what we study in the Groove Lab. The belief is, that through definition and training groove is a skill that can be improved, not an innate ability you either have or don’t.
If you’re ready to start improving your groove, and become the best bassist you can be, sign up for a free consultation/diagnostic meeting. That will help evaluate where you are and see if private lessons are a good fit for your bass journey.
Put This Into Practice
The Rhythm Map you just learned is Step One of Groove Lab Study 3, a free guided study using a Hip Hop and Jazz Fusion backing track. In the study you’ll map the drums, and use that to write a bass rhythm that locks in with the drums, before moving on to chord analysis and voice leading. It’s the fastest way to apply this method to a real song instead of jut a concept.